インシデントの表示(Northstar)
インシデントは、調査が必要な重大なセキュリティの問題を表します。Contrastでは、少なくとも1つの悪用された攻撃イベントまたは疑わしい攻撃イベントが観測され、スコア(CVSS v4に基づく)が7を超えると、自動的にインシデントが作成されます。
開始する前に
アクションと権限に、必要な権限が記載されています。
手順
インシデントの一覧を表示するには、左側のナビゲーションからインシデントを選択します。
一覧には、各インシデントについて次の詳細が表示されます。
深刻度:Contrastでインシデントに割り当てられた深刻度。
Contrastスコア:Contrastスコアは、特定の時点における課題またはインシデントのリスクを表します。このスコアの決定には、Contrast SAST、IAST、SCA、ADR、およびオブザーバビリティのテクノロジからの情報を利用しています。
スコアの算出には、主に共通脆弱性評価システムバージョン4(CVSS 4)を使用しています。
インシデント:インシデントの種類(SQLインジェクションなど)。
インシデントID:Contrastでインシデントに割り当てられた識別子。形式は以下の通りです。
INC-<year>-<numberOfIncidents>例えば、
INC-2025-33は、2025年に発生し、Contrast で報告された33件目のインシデントを表します。ステータス:インシデントのステータス(オープンまたはクローズ)。
関連するアプリケーション:インシデントの影響を受けるアプリケーション。
担当:インシデントの調査に割り当てられたユーザ。
作成日時:Contrastでインシデントが作成された時間。
最終更新日時:Contrastが新しい問題または観測結果でインシデントを更新した最終時刻。
インシデントの詳細を表示するには、インシデントを選択します。 概要タブに、次の詳細が表示されます。
基本情報:
インシデントID:Contrastでインシデントに割り当てられた識別子。
ソースIP:攻撃イベントの発生元であるIPアドレス。
深刻度:Contrastでインシデントに割り当てられた深刻度。
ステータス:インシデントのステータス(オープンまたはクローズ)。
作成日時:Contrastでインシデントが作成された日時。
担当:インシデントの調査と修復を担当するユーザ。
ルール:インシデントのトリガーとなったルール。
MITRE:課題に関連するMITRE ATT&CK戦術へのリンク。
MITRE ATT&CKフレームワークは、実世界で観測された攻撃者の戦術や手法をまとめたナレッジベースです。
単一の攻撃イベントが複数の戦術にマッピングされることがあります。多段階の攻撃イベントが発生した場合、観測されたイベントは、より大規模な攻撃連鎖内の単一のアクションを表している可能性があります。あるいは、脅威ベクトルを示している可能性もあります。
イベントデータを、WAF(Webアプリケーションファイアウォール)やEDR(エンドポイントにおける検知と対応)ソリューションなど、他のセキュリティツールからのセキュリティ情報と組み合わせることで、戦術をより正確に特定することができます。この精緻化により、攻撃の全容を把握することができます。
イベントをATT&CK戦術にマッピングすることは、リスク評価において非常に重要です。これにより、リスクの高い領域を特定し、新しい検知方法の開発に優先順位を付けることができます。このプロセスは、セキュリティカバレッジの拡大につながります。
詳細については、 MITRE ATT&CKをご覧ください。
サマリー:
Contrastスコア:Contrastでインシデントに割り当てられたスコア。
何が起こったか:インシデント作成のトリガーとなった観測についての説明。
封じ込めアクション:
ランブックを表示:ランブックは、セキュリティチームが特定のセキュリティイベントやインシデントを効果的にトリアージし、対応するための段階的なガイドを提供します。
エスカレーション:インシデントに対応する必要があるチーム メンバーに電子メールを送信します。
ブロック IP :インシデントに関連付けられた IP アドレスを拒否リストに追加できます。
Add exclusion: Lets you view or add application exclusions for an incident.
インシデントトレース:
インシデントトレースは、動作、上記以外のコンポーネントへの接続、及びContrastが検出及び報告済の攻撃データのグラフィカルモデルを提供します。これは、ルート使用中、メッセージキュー、ウェブリクエスト、データベース、APIコール、その他のアプリケーションエントリを示します。特定のエンティティにインシデントが影響を与える場合、モデルはインシデントインジケーターを表示します。

各エントリーポイントの詳細を表示するには、その上にカーソルを合わせてください。
注記
インシデントトレースはJava 6.20.1エージェントのみをサポートしています。エージェントの設定ファイルで観測モードをオンにする必要があります。
インシデントトレースにはこれらのエンティティが表示されます。
エンティティ
説明
例
アプリケーション
インシデントが影響を与えるアプリケーション。
my-petclinicリソース
アプリケーションのエントリーポイントを特定し、使用中のルート、メッセージキュー、ウェブリクエストなどを含みます。
GET/customer-infoアクション
Contrastがアプリケーションのエントリポイントで観測するセキュリティ関連の動作
これらの動作のうち一つまたはさらにその他:
データベース接続(データベースのインスタンス名を含む)
データベース呼び出し
アクセスしたファイルやディレクトリの名前を含む、ファイルシステムへのアクセス
アウトバウンドサービスまたはAPIコール
認証と認可の検出
システムコマンド
潜在的に危険な関数
カスタマイズされたセキュリティ制御がサービスまたはAPIルートに適用されました。
あなたが表示するエンティティに依存して、インシデントトレースはこれらの詳細の一部または全てを表示します(全てのエンティティが同じ詳細を表示するわけではありません):
エンティティ
詳細
アプリケーション
URL: アプリケーションのURL
リソース
攻撃値: Contrastで観測された攻撃ペイロード
環境: 処理が発生する環境: 開発、QA、または本番
種類:リソースが使用するレスポンスタイプです。例:
application/jsonまたはtext/htmll
アクション
シンク情報(該当する場合):
Contrastが実行したアクションを示す攻撃結果(例: ブロック済みまたは悪用済み)
攻撃に適用されたContrastポリシーの名前
攻撃値
リクエスト値: Contrastで観測されたリクエストの内容。
関連するアセット:インシデントが発生したアプリケーション、サーバ、および環境。
アプリケーションとその関連エンティティ(サーバ、呼び出しAPI、データベース)の間の関係を表示するには、アプリケーションのリンクを選択してエクスプローラーでビューを開きます。
環境は、開発、QA、および本番です。
関連する課題:インシデントに関連する全ての課題。
攻撃値:シンクに行くのがContrastで観測された疑わしい値。
ベクトル解析:Contrastで観測された、悪意のある攻撃者がシステムにアクセスできるさまざまな経路や方法。
リクエスト詳細: インシデントに関連付けられたリクエストに関する追加の詳細。
コードの場所: Contrastで攻撃イベントが検知されたコードの場所の詳細。これらの詳細には以下が含まれます。
ファイル:攻撃イベントに関連するファイル。
メソッド:攻撃イベントに関連するメソッド。
スタック:攻撃イベントに関連するコードスタック。
インシデントのアクティビティログを表示するには、アクティビティタブを選択します。
Contrastの全てのアクティビティとタスク割り当てに関するアクティビティを表示するには、 全てタブを選択します。
最新フィルターを使用して、新しい順に順序を変更できます。
コメントを表示するには、コメントタブを選択します。
コメントを追加するには、「コメントを追加」ボックスにコメントを入力し、矢印アイコンを選択します。
To view a list of Contrast observations, select the Observations tab. The list of observations includes these details:
ソースIP:攻撃イベントの発生元であるIPアドレス。
ルール:インシデントのトリガーとなったルール。
Application: The name of the application where Contrast detected an attack event.
Server: The name of the server associated with the application.
検知:Contrastで攻撃イベントが検知された時間。
結果:攻撃イベントの結果。考えられる結果としては、深刻度の高い順に次のとおりです:
攻撃検出済:
Contrastで、攻撃イベントが境界(ペリメータ)で検知され、シンクで攻撃が成立したことが確認されました。モードは監視に設定されています。
次の深刻度にマップされます:重大または高
疑わしい:
境界のみを対象とするルールがブロックモードに設定されている場合に、信頼度の低い攻撃イベントが境界で検知されました。
境界のみを対象とするルールが監視モードに設定されている場合に、信頼性の高いまたは低い攻撃イベントが境界で検知されました。
シンクのみのヒューリスティックを使用して攻撃イベントが検知されました。モードは監視に設定されています。
次の深刻度にマップされます:中
ブロック済:
Contrastで、攻撃イベントが境界で検知され、シンクで攻撃が成立したことが確認されました。モードはブロックに設定されています。
シンクのみのヒューリスティックを使用して攻撃イベントが検知されました。モードはブロックに設定されています。
次の深刻度にマップされます:情報
探査検出:
境界で攻撃イベントが検知されましたが、シンクでは攻撃が成立したことが確認されませんでした。モードはブロックまたは監視に設定されています。
これらは、攻撃者がアプリケーションの脆弱性を探索、スキャン、ファジングしている可能性を示す、効果のない攻撃です。
次の深刻度にマップされます:低
URL:攻撃者が攻撃イベントに使用したパス。
Value: The value associated with the observation.
For attack observations, this value is the attack value.
For vulnerability observations, no value is shown.
ビューを絞り込む
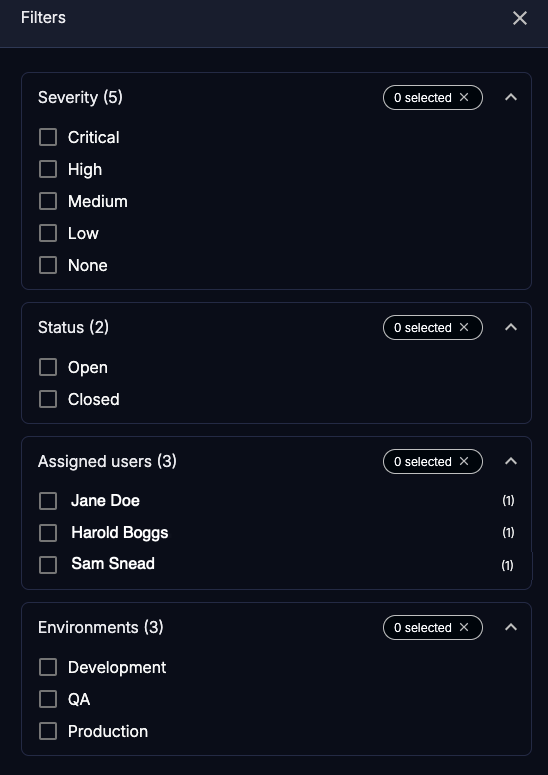
表示を絞り込むには、 フィルタアイコン()を選択してフィルタパネルを開き、1 つ以上のフィルタを選択します。フィルターは以下のとおりです。

フィルタには次のものがあります:
深刻度:インシデントの深刻度
ステータス:インシデントのステータス
割り当てられたユーザ: インシデントに割り当てられたユーザの名前
環境: Contrastがインシデントを検出した環境: 開発、QA、および本番。